
But just because it is my last year that doesn't mean that I still won't log on every once and a while to torment the web with my posts. For instance...
Adobe CC: What new and Happenin'
For the first project of the year we had to choose something new that appeared in the Adobe updates over the summer. In the project I chose I actually went off the beaten path a little bit and instead of explaining the actual project I did I explained something that had been confused during the project.
My Project
I was watching the instructional video on lynda.com and the project was taking an image and making it look textured using other pictures. I will say that we did not spend very long on the project so unfortunately it hasn't been finished. Yet.
Choosing Images
 Step one was to find a base image. The photos from the video were unavailable so the creative juices began to flow. In the project the instructor was using a goblin base and using a scaly texturing. Wanting to do something close to that I went with a dragon creature that I had created on a PC game called Spore. I used this image because it was a simple in shape and already had little to no texturing in the first place.
The next step was to find images that would have the textures that I would be looking for when creating my new and improved creature. The main photos were of alligators and snakes for the scaly texture that would go on the face and eyes. I then found a picture of a ram and a cattle skull to make the horns that were on the top of the head.
 Starting in Photoshop

Finally I had the materials needed to go ahead and start working in photoshop. First the base image was put onto photoshop and then turned into an art board layer. this was done by right clicking on the layer in the layers panel and then clicking art board from layers. Next was to bring in all of the texture pics and all of these pictures would need to remain as layers for it to work. In order to do that the images would have to be dragged off of the art board and into the surrounding space. At this point it was a good idea to rasterize all of the layers if they weren't already, just because it made it easier to mess with them.
The Base Image
Once all the images are in their respective places the next thing to do was to make sure the base image layer was selected, then go up to image, then adjustments, then click on levels. Adjust it slightly so that the some of the details on the base image are visible. That will help to decide where to put some of the other images later on. Next take the base image and turn it into a black and white image. The coloring would happen later on with the layers that will be put on the image.
 The next thing to do is to highlight some of the different parts of the base image. In the art board on a different layer take the paint brush and begin to circle some of the areas that will use the textures. In this I circled the horns, eyes and snout because those will be the main area of my focus. Also notice the arrow on the side of the snout; it is showing the direction of the head and will also direct some of the scaling later on.
Once you are done with that start another layer in the art board. Still using the brush tool take the color from some of your images and begin a simple sketch of how you want the layout to look. It doesn't have to be exact or all that pretty but it helps to give a basic idea of the direction you want to go in.
Putting in the Layers
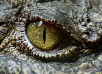 Once you have an idea of what you want to put on and where click on the layer of the image you want to use. Use the lasso tool to circle around the texture or shape you want to use. For this I went with one of the eyes. After the lasso is complete click up on the select and mask button. This was the new part that I showed because before hand it used to be just the refine edge tool. The new button shows several different tools that you can use. The main focus is on the feathering slider; just mess with it so it has a little bit of that blur around the edge. Click Ok once you are done. Next copy the image and then paste it into a new layer on the art board. Place it over the desired area and using the command button and T you can turn it and stretch it to your liking.
Well that is all I have for now, This may be updated in the future with a more complete project.
Jake Smith
No comments:
Post a Comment